Forms
Forms are an important part of a website. Through forms, the user submits the required information to you. Among the situations you encounter when working with forms are sending the validation errors produced in the controller to the view, and setting the initial values of fields when the forms are opened.
In the framework, the packages\base\views\form class is provided for managing forms and the interaction between the controller and the view.
To work with forms, the view class must either extend the packages\base\views\form class or use the packages\base\views\traits\form trait in the view class.
Example view class: extending the class
<?php
namespace themes\themename\views;

use packages\base\views\Form;

class ContactUs extends Form {

}
Example view class: using the trait
<?php
namespace themes\themename\views;

use packages\base\View;
use packages\base\views\traits\Form;

class ContactUs extends View {
    use Form;
}
Marking fields that have errors
The setFormError() method marks the fields that have errors so they can be sent to the view.
The input argument of this method is an object of the packages\base\views\FormError class.
This method is called in the controller to send the fields that have errors to the view.
Example controller file
<?php
namespace packages\packagename\controllers;

use packages\packagename\User as Model;
use themes\themename\views\packagename as views;
use packages\base\{Controller, Response, View, InputValidationException, Password};

class Main extends controller {

    public function login(): Response {

        $view = View::byName(views\Login::class);
        $this->response->setView($view);

        $inputRules = array(
            "username" => array(
                "type" => "email",
            ),
            "password" => array()
        );
        try {
            $this->response->setStatus(false);
            $inputs = $this->checkinputs($inputRules);
            $model = new Model();
            $model->where("email", $inputs["username"]);
            $user = $model->getOne();
            if (!$user) {
                throw new inputValidationException("username");
            }
            if (Password::verify($inputs["password"], $this->password)) {
                throw new inputValidationException("password");
            }
            Session::set("login", true);
            Session::set("userID", $user->id);
            $this->response->setStatus(true);
            $this->response->Go(base\url("userpanel"));
        } catch(InputValidationException $error) {
            $view->setFormError(FormError::fromException($error));
        }
        return $this->response;
    }
}
In the example above, if the received data is invalid, an InputValidationException is thrown. In the catch block, the setFormError method is called and receives the field that has the error as its input.
The conversion of the packages\base\InputValidationException and packages\base\db\DuplicateRecord exceptions into form errors is performed automatically by the framework, and the programmer does not need to write it.
For more information about validation, refer to the Validation page.
Retrieving fields that have errors
The getFormErrors() and getFormErrorsByInput($input) methods
are defined for retrieving the recorded errors.
The getFormErrors method takes no input argument.
Its output is an array of objects of the packages\base\views\FormError class that identify the fields that have errors.
The getFormErrorsByInput method receives the name of the desired field as input; its output is an object of the packages\base\views\FormError class if the field has an error, and false if it does not.
Example
<form action="" method="post">
<?php
$fnameError = $this->getFormErrorsByInput('fname');
$lnameError = $this->getFormErrorsByInput('lname');
$socialNumberError = $this->getFormErrorsByInput('social_number');
?>
	<div class="form-group <?php echo $fnameError ? 'has-error' : ''; ?>">
		<label class="control-label" for="fname"><?php echo t("fname"); ?></label>
		<input type="text" name="fname" id="fname" class="form-control">
	<?php
	if($fnameError) {
		$text = $fnameError->getMessage();
		if (!$text) {
			$text = t($fnameError->getCode());
		}
		echo "<span class=\"help-block\" >{$text}</span>";
	}
	?>
	</div>

	<div class="form-group <?php echo $lnameError ? 'has-error' : ''; ?>">
		<label class="control-label" for="lname"><?php echo t("lname"); ?></label>
		<input type="text" name="lname" class="form-control">
	<?php
	if($lnameError) {
		$text = $lnameError->getMessage();
		if (!$text) {
			$text = t($lnameError->getCode());
		}
		echo "<span class=\"help-block\" >{$text}</span>";
	}
	?>
	<div class="form-group <?php echo $socialNumberError ? 'has-error' : ''; ?>">
		<label class="control-label" for="social_number"><?php echo t("social_number"); ?></label>
		<input type="text" name="social_number" class="form-control">
	<?php
	if($socialNumberError) {
		$text = $socialNumberError->getMessage();
		if (!$text) {
			$text = t($socialNumberError->getCode());
		}
		echo "<span class=\"help-block\" >{$text}</span>";
	}
	?>
	</div>

</form>
In the example above, if any of the fields has an error, the has-error class is applied to that field. (So that, for example, the field's border turns red and the user notices the error in the field.)
You can also display the reason the error occurred. By calling the getMessage method, you can retrieve and display the error text if one has been stored in it. You can also add a translation for each error code and display it through the translator.
You can retrieve the error code and, based on it, display your own desired text. Using the translator ( even when your site is single-language ) is recommended only for shortening the code and making the errors consistent.
<?php
namespace packages\packagename\controllers;

use function packages\base\url;
use packages\packagename\Trip\Signup as Model;
use themes\themename\views\packagename\Trips as views;
use packages\base\{Controller, Response, View, InputValidationException, db\DuplicateRecord};

class Trips extends Controller {
	public function signup(): Response {

		$view = View::byName(views\Signup::class);
	    $this->response->setView($view);

		$inputs = $this->checkInputs(array(
			"fname" => array(
				"type" => "string",
			),
			"lname" => array(
				"type" => "string",
			),
			"social_number" => array(
				"type" => "string",
			),
		));

		if (strlen($inputs["social_number"]) < 10) {
			throw new InputValidationException("social_number");
		}

		$model = new Model();
		$model->where("social_number", $inputs["social_number"]);
		if ($model->has()) {
			throw new DuplicateRecord("social_number");
		}

		$model = new Model();
		$model->name = $inputs["fname"];
		$model->last_name = $inputs["lname"];
		$model->social_number = $inputs["social_number"];
		$model->save();

		$this->response->Go(url("trips/signup/{$model->id}/overview"));

		$this->response->setStatus(true);
		return $this->response;
	}
}
Exception codes
| Code | Exception |
|---|---|
| data_validation | packages\base\InputValidationException |
| data_duplicate | packages\base\db\DuplicateRecord |
Example translator file
{
	"rtl": true,
	"phrases": {
		"data_validation": "داده وارد شده معتبر نیست",
		"data_duplicate": "داده وارد شده تکراری میباشد"
	}
}
For more information, refer to the Translator and Errors in the View pages.
Clearing a field's error
To clear the recorded error for a field, the clearInputErrors method is used.
The input argument of this method is the name of the desired field.
Example
<?php
namespace themes\themename\views\packagename;

use packages\base\views\Form;

class Login extends Form {

	private $hasError = false;

	public function __beforeLoad() {
		$this->setTitle(t("login.title"));
		if ($this->getFormErrorsByInput("username") or $this->getFormErrorsByInput("password")) {
			$this->hasError = true;
			/**
			 * Prevent to show which field is wrong.
			 */
			$this->clearInputErrors("username");
			$this->clearInputErrors("password");
		}
	}
	/**
	 * You can use this to find form has error or not
	 */
	protected function hasError(): bool {
		return $this->hasError;
	}
}
Setting the values of form fields
Two methods, setDataForm and setDataInput, are defined for setting the values of form fields. The methods take two input arguments: the first argument is the field's value, and the second argument is the field's name.
To set field values with the approach above, the method must be called once per field. To avoid repetitive code, you can pass the input argument of the setDataForm method as an array; in that case, the framework automatically treats each element's key as the field name and its value as the field's value.
If the first argument is an array and the second argument is also provided ( that is, the field name is specified ), the entire array is assigned to that key. ( This is useful for multiple and array-type inputs. )
The setDataInput method is used only for setting the value of a single field.
One use of defining fields as an array is when the number of fields is variable; to make validating and managing the fields easier, we name the fields in array form.
Example of setting values as an array with the setDataForm method
$this->setDataForm(array(
    'telegram' => '@jalno_support',
    'twitter' => '@jalnoco',
), 'socialnets');

// or

$this->setDataForm(array(
    'socialnets' => array(
        'telegram' => '@jalno_support',
        'twitter' => '@jalnoco',
    ),
));
The values can be accessed in the inputs as follows.
<input type="text" value="<?php echo $this->getDataForm('socialnets')['twitter'] ?? ''; ?>" name="socialnets[twitter]" class="form-control ltr" placeholder="Twitter">
<input type="text" value="<?php echo $this->getDataForm('socialnets')['telegram'] ?? ''; ?>" name="socialnets[telegram]" class="form-control ltr" placeholder="Telegram">
Example 1: Example controller file
<?php
namespace packages\packagename\controllers;

use packages\base\{Controller, Response};
use pacakges\packagename\ContactLetter as Model;
use themes\themename\views\pacakgename\contact as views;

class ContactUS extends Controller {
	public function store(): Response {

		$view = View::byName(Views\Add::class);
		$this->response->setView($view);

		$inputRules = array(
			"name" => array(
				"type" => "string",
			),
			"message" => array(
				"type" => "string",
			),
		);
		try {
			$inputs = $this->checkinputs($inputRules);

			$model = new Model();
			$model->name = $inputs['name'];
			$model->message = $inputs['message'];
			$model->save();

			$this->response->setStatus(true);
		} catch(inputValidationException $error) {
			$view->setFormError(FormError::fromException($error));
			$view->setDataForm($this->inputsvalue($inputRules));
		}
		return $this->response;
	}
}
The inputsvalue method returns all the values submitted by the user for the fields specified in the $inputRules variable as a key-value array. Each element's key is the field name, and its value is the value submitted by the user.
This method gives you the ability to, after any error occurs on the page, place the values submitted by the user back into each field, so that the user does not have to fill in all the fields again.
For exceptions handled by the framework, this is done automatically.
Example 2: Example view file
<?php
namespace themes\themename\views;

use packages\base\{views\Form, Date};

class Add extends Form {
	public function __beforeLoad(){
		if (!$this->getDataForm("started_at")) {
			$this->setDataForm(Date::format('Y/m/d'), "started_at");
		}
	}
}
In the example above, the getDataForm method is first used to check whether the started_at field has a value; if it does not, the current time is set as its value.
Populating fields
The getDataForm() and getDataInput() methods are defined for populating field values.
Both methods receive the field name as their input argument. If no value has been set for the specified field, the output of the getDataForm method is empty ( null ) and the output of the getDataInput method is an empty string.
If we want the fields to be populated with the desired values after the page loads, we must call the above methods in the value attribute of the form tags.
Example 1: Example view file
<?php
namespace themes\themename\views;
use packages\base\views\Form;
use packages\base\date;

class Add extends Form {
	function __beforeLoad(){
		if (!$this->getDataInput("fname")) {
			$this->setDataForm("first name", "fname");
		}
		if (!$this->getDataInput("lname")) {
			$this->setDataForm("last name", "lname");
		}
	}
}
Example 2: Example HTML file
<form action="" method="post">
	<input type="text" name="fname" value="<?php echo $this->getDataForm('fname');?>">
	<input type="text" name="lname" value="<?php echo $this->getDataForm('lname');?>">
</form>
The field must first be assigned a value with the setDataForm or setDataInput method before its value can be retrieved with the getDataForm or getDataInput methods.
The createField method
To make managing errors and populating forms easier, you can use the createField method, which is defined in the userpanel package.
This method displays the thrown packages\base\InputValidationException and packages\base\db\DuplicateRecord exceptions within the form. It also populates a field if it has been assigned a value, and if a field has an error, it displays the error text beneath it.
To use the createField method, you must use the themes\clipone\views\formTrait trait in the view class.
Currently, the userpanel package uses Bootstrap version 3, and the appearance generated for forms is based on Bootstrap version 3.
<?php
namespace themes\themename\views;

use packages\base\View;
use themes\clipone\views\formTrait;

class ContactUs extends View {
    use formTrait;
}
The input argument of the createField method is a key-value array of the field's properties. You can define the following properties for fields.
- type: Specifies the field's type. (It accepts all field types.)
- name: Receives the field's name.
- placeholder: Receives the default text shown when the field is empty.
- value: Receives the field's default value.
- label: Receives the field's label.
- class: Receives the CSS classes for the field.
- id: Receives the field's id.
- required: Receives whether or not the field is required.
- minlength: Receives the minimum length of the string.
- maxlength: Receives the maximum length of the string.
- icon: If this property is set, the fields are created as an input-group.
- title: Receives the title value for the field.
- disabled: Receives whether or not the field is disabled.
- readonly: Receives whether the field is writable or read-only.
- rows: Receives the number of rows for textarea fields.
- min, max, step: Receives the minimum, maximum, and increment step values for number fields.
- accept: Receives the acceptable file types for file fields.
- ltr: Used for fields whose values must be written left-to-right.
- data: Used for data attributes that can be read by JavaScript.
type
type accepts all the types that exist for forms. If its value is select, radio, or checkbox, the options key must also be defined for it. The options key receives a key-value array as its parameter, in which the title key sets the option's label and the value key sets its value.
The default value of the type key is text.
Example
<form action="" method="post">
<?php
$fields = [
[
'name' => 'name',
'type' => 'text',
'placeholder' => 'Zahra Mohammadi',
'label' => 'Name'
],
[
'label' => 'Email',
'name' => 'email',
'type' => 'email',
],
[
'label' => 'Mobile',
'placeholder' => '09131234567',
'name' => 'mobile',
'type' => 'number',
'minlength' => 10,
'maxlength' => 12
],
[
'label' => 'Subject',
'placeholder' => 'Subject',
'name' => 'subject',
'type' => 'text'
],
[
'label' => 'Message type',
'name' => ' msgType',
'type' => 'select',
'options' => [
[
'value' => 1,
'title' => 'Criticism'
],
[
'value' => 2,
'title' => 'Suggestion'
]
]
],
[
'label' => 'Message text',
'placeholder' => 'Message text',
'label' => 'Message text',
'name' => 'msg',
'type' => 'textarea',
'required' => true
]
];
foreach($fields as $row){
$this->createField($row);
}
?>
<button type="submit" class="btn btn-success"><i class="fa fa-send"></i> Send </button>
</form>
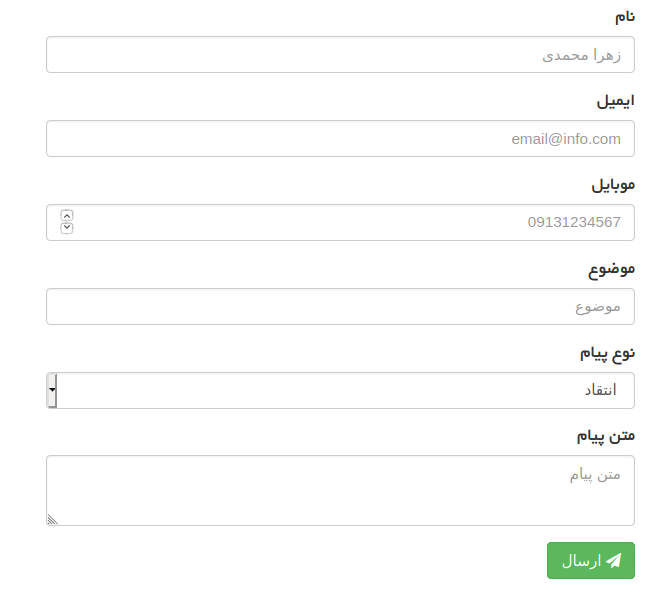
The result of the code above is the following HTML.
<form action="" method="post">
<div class="form-group">
<label class="control-label">Name</label>
<input type="text" value="" name="name" class="form-control" placeholder="Zahra Mohammadi">
</div>
<div class="form-group">
<label class="control-label">Email</label>
</div>
<div class="form-group">
<label class="control-label">Mobile</label>
<input type="number" value="" minlength="10" maxlength="12" name="mobile" class="form-control" placeholder="09131234567">
</div>
<div class="form-group">
<label class="control-label">Subject</label>
<input type="text" value="" name="subject" class="form-control" placeholder="Subject">
</div>
<div class="form-group">
<label class="control-label">Message type</label>
<select name=" msgType" class="form-control">
<option value="1">Criticism</option>
<option value="2">Suggestion</option>
</select>
</div>
<div class="form-group">
<label class="control-label">Message text</label>
<textarea required="" name="msg" class="form-control" placeholder="Message text"></textarea>
</div>
<button type="submit" class="btn btn-success">
<i class="fa fa-send"></i> Send
</button>
</form>
The generated form is displayed on the web page as follows.
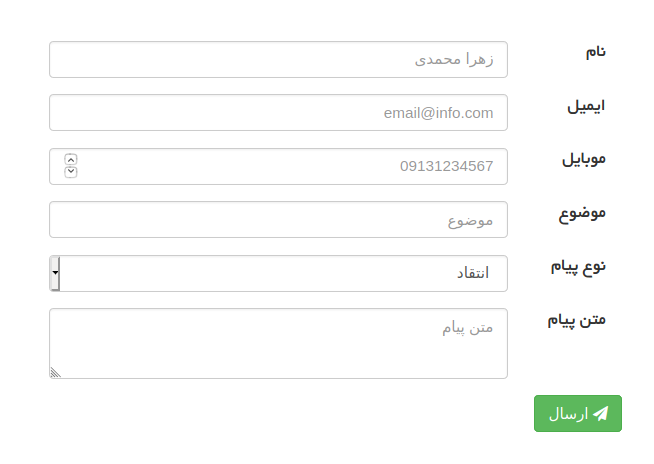
 If you want the form fields to be created on a single line, you can use the
 setHorizontalForm method.
Using Bootstrap's grid classes, this method displays the form fields on a single line.
The setHorizontalForm method takes two input arguments. The first argument is the grid class for the label, and the second argument is the grid class for the input.
You can call the method as follows.
<?php
	$this->setHorizontalForm("sm-2", "sm-10");
	foreach($fields as $row){
		$this->createField($row);
	}
?>
The output of the code above is as follows.
<form action="" method="post" style="overflow: auto">
<div class="form-group">
<label class="control-label col-sm-2">Name</label>
<div class="col-sm-10">
<input type="text" value="" name="name" class="form-control" placeholder="Zahra Mohammadi" />
</div>
</div>
<div class="form-group">
<label class="control-label col-sm-2">Email</label>
<div class="col-sm-10">
</div>
</div>
<div class="form-group">
<label class="control-label col-sm-2">Mobile</label>
<div class="col-sm-10">
<input type="number" value="" minlength="10" maxlength="12" name="mobile" class="form-control"
placeholder="09131234567" />
</div>
</div>
<div class="form-group">
<label class="control-label col-sm-2">Subject</label>
<div class="col-sm-10">
<input type="text" value="" name="subject" class="form-control" placeholder="Subject" />
</div>
</div>
<div class="form-group">
<label class="control-label col-sm-2">Message type</label>
<div class="col-sm-10">
<select name=" msgType" class="form-control">
<option value="1">Criticism</option>
<option value="2">Suggestion</option>
</select>
</div>
</div>
<div class="form-group">
<label class="control-label required col-sm-2">Message text</label>
<div class="col-sm-10">
<textarea required="" name="msg" class="form-control" placeholder="Message text"></textarea>
</div>
</div>
<button type="submit" class="btn btn-success">
<i class="fa fa-send"></i> Send
</button>
</form>
The generated form is displayed on the web page as follows.
ltr
If the value true is given to the ltr key, the ltr class is added to the field. In the userpanel package, the ltr class is defined as follows.
.ltr {
    direction: ltr;
    text-align: left;
}
data
The data key takes a key-value array that is used to generate data attributes that can be read by JavaScript.
$this->createField(array(
    'name' => 'operator_name',
    'label' => 'Operator',
    'type' => 'text', // This is optional
    'title' => 'To search for an operator, enter part of its name or email and select one from the results',
    'data' => array(
         'toggle' => 'tooltip',
         'placement' => 'top',
    ),
));
The output of the method above is as follows.
<div class="form-group">
    <label class="control-label">Operator</label>
    <input type="text" value="" name="operator_name" class="form-control" title="To search for an operator, enter part of its name or email and select one from the results" data-toggle="tooltip" data-placement="top">
</div>